基于Token的RESTful API,Spring Security入门
基于Token的RESTful API,Spring Security入门
dong4j在大部分时候,我们讨论 API 的设计时,会从功能的角度出发定义出完善的,易用的 API。而很多时候,非功能需求如安全需求则会在很晚才加入考虑。而往往这部分会涉及很多额外的工作量,比如与外部的 SSO 集成,Token 机制等等。
这篇文章会以一个简单的例子,从应用程序和部署架构上分别讨论几种常见的模型。这篇文章是这个系列的第一篇,会讨论两个简单的主题:
- 基于 Session 的用户认证
- 基于 Token 的 RESTful API(使用 Spring Security)
使用 Session
由于 HTTP 协议本身是无状态的,服务器需要某种机制来区分每个请求。比如在返回给客户的响应中加入一些 ID,客户端再次请求时带上这个 ID,这样服务器就可以区分出来每个请求,并完成事务性的操作(完成订单的创建,更新,商品派送等等)。
在多数 Web 容器中,这种机制通过 Session 来实现。Web 容器会为每个首次请求创建一个 Session,并将 Session 的 ID 以浏览器 Cookie 的方式返回给客户端。客户端(常常是浏览器)在后续的请求中带上这个 Session 的 ID 来表明自己的身份。这种机制同样被用在了鉴权方面,用户登录系统之后,系统分配一个 Session ID 给他。
除非 Session 过期,或者用户从客户端的 Cookie 中主动删了 Session ID,否则在服务器端来看,用户的信息会和这个 Session 绑定起来。后台系统也可以随时知道请求某个资源的真实用户是谁,并以此来判断该用户时候真的有权限这么做。
1 | HttpSession session = request.getSession(); |
Session 的问题
这种做法在小规模应用中工作良好,随着用户的增多,企业往往需要部署多台服务器形成集群来对外提供服务。在集群模式下,当某个节点挂掉之后,由于 Session 默认是保存在部署 Web 容器中的,用户会被误判为未登录,后续的请求会被重定向到登陆页面,影响用户体验。
这种将应用程序状态内置的方法已经完全无法满足应用的扩展,因此在工程实践中,我们会采用将 Session 外置的方式来解决这个问题。即集群中的所有节点都将 Session 保存在一个公用的键值数据库中:
1 |
|
上面这个例子是在 Spring Boot 中使用 Redis 来外置 Session。Spring 会拦截所有对 HTTPSession 对象的操作,后续的对 Session 的操作,Spring 都会自动转换为与后台的 Redis 服务器的交互,从而避免节点挂掉之后 Session 丢失的问题。
1 | spring.redis.host=192.168.99.100 |
如果你跟我一样懒的话,直接启动一个 redis 的 docker container 就可以:
1 | $ docker run --name redis-server -d redis |
这样,多个应用共享这一个实例,任何一个节点的终止、异常都不会产生 Session 的问题。
基于 Token 的安全机制
上面说到的场景中,使用 Session 需要额外部署一个组件(或者引入更加复杂的 Session 同步机制),这会带来另外的问题,比如如何保证这个节点的高可用,除了 Production 环境之外,Staging 和 QA 环境也需要这个组件的配置、测试和维护。
很多项目现在会采用另外一种更加简单的方式:基于 Token 的安全机制。即不使用 Session,用户在登陆之后,会获得一个 Token,这个 Token 会以 HTTP Header 的方式发送给客户,同样,客户再后续的资源请求中也需要带着这个 Token。通常这个 Token 还会有过期时间的限制(比如只能使用 1 周,一周之后需要重新获取)。
基于 Token 的机制更加简单,和 RESTful 风格的 API 一起使用更加自然,相较于传统的 Web 应用,RESTful 的消费者可能是人,也可能是 Mobile App,也可能是系统中另外的 Service。也就是说,并不是所有的消费者都可以处理一个登陆表单!
Restful API
我们通过一个实例来看使用 Spring Security 保护受限制访问资源的场景。
对于 Controller:
1 |
|
我们需要所有请求上都带有一个X-Auth-Token的 Header,简单起见,如果这个 Header 有值,我们就认为这个请求已经被授权了。我们在 Spring Security 中定义这样的一个配置:
1 |
|
我们使用SessionCreationPolicy.STATELESS无状态的 Session 机制(即 Spring 不使用 HTTPSession),对于所有的请求都做权限校验,这样 Spring Security 的拦截器会判断所有请求的 Header 上有没有 “X-Auth-Token”。对于异常情况(即当 Spring Security 发现没有),Spring 会启用一个认证入口:new RestAuthenticationEntryPoint。在我们这个场景下,这个入口只是简单的返回一个 401 即可:
1 |
|
这时候,如果我们请求这个受限制的资源:
1 | $ curl http://api.kanban.com:9000/api/protected/1 -s | jq . |
过滤器(Filter)及预认证(PreAuthentication)
为了让 Spring Security 可以处理用户登录的 case,我们需要提供一个Filter。当然,Spring Security 提供了丰富的Filter机制,我们这里使用一个预认证的Filter(即假设用户已经在别的外部系统如 SSO 中登录了):
1 | public class KanBanPreAuthenticationFilter extends AbstractPreAuthenticatedProcessingFilter { |
过滤器在获得 Header 中的 Token 后,Spring Security 会尝试去认证用户:
1 |
|
这里的KanBanAuthenticationUserDetailsService是一个实现了 Spring Security 的 UserDetailsService 的类:
1 | public class KanBanAuthenticationUserDetailsService |
这个类的职责是,查看从KanBanPreAuthenticationFilter返回的PreAuthenticatedAuthenticationToken,如果不为空,则表示该用户在系统中存在,并正常加载用户。如果返回 null,则表示该认证失败,这时根据配置,Spring Security 会重定向到认证入口RestAuthenticationEntryPoint。
加上这个过滤器的配置之后:
1 |
|
这样,当我们在 Header 上加上X-Auth-Token之后,就会访问到受限的资源了:
1 | $ curl -H "X-Auth-Token: juntao" http://api.kanban.com:9000/api/protected/1 -s | jq . |
前后端分离之后
前后端分离之后,在部署上通过一个反向代理就可以实现动静态分离,跨域问题的解决等。但是一旦引入鉴权,则又会产生新的问题。通常来说,鉴权是对于后台 API/API 背后的资源的保护,即未经授权的用户不能访问受保护资源。
要实现这个功能有很多种方式,在应用程序之外设置完善的安全拦截器是最常见的方式。不过有点不够优雅的是,一些不太纯粹的、非功能性的代码和业务代码混在同一个代码库中。
另一方面,各个业务系统都可能需要某种机制的鉴权,所以很多企业都会搭建 SSO 机制,即 Single Sign-On。这样可以避免人们在多个系统创建不同账号,设置不同密码,不同的超时时间等等。如果 SSO 系统已经先于系统存在了很久,那么新开发的系统完全不需要自己再配置一套用户管理机制了(一般 SSO 只会完成鉴权中鉴别的部分,授权还是需要各个业务系统自行处理)。
本文中,我们使用基础设施(反向代理)的一些配置,来完成保护未授权资源的目的。在这个例子中,我们假设系统由这样几个服务器组成:
系统组成
这个实例中,我们的系统分为三部分
kanban.com:8000(业务系统前端)api.kanban.com:9000(业务系统后端 API)sso.kanban.com:8100(单点登录系统,登陆界面)
前端包含了 HTML/JS/CSS 等资源,是一个纯静态资源,所以本地磁盘即可。后端 API 则是一组需要被保护的 API(比如查询工资详情,查询工作经历等)。最后,单点登录系统是一个简单的表单,用户填入用户名和密码后,如果登录成功,单点登录会将用户重定向到登录前的位置。
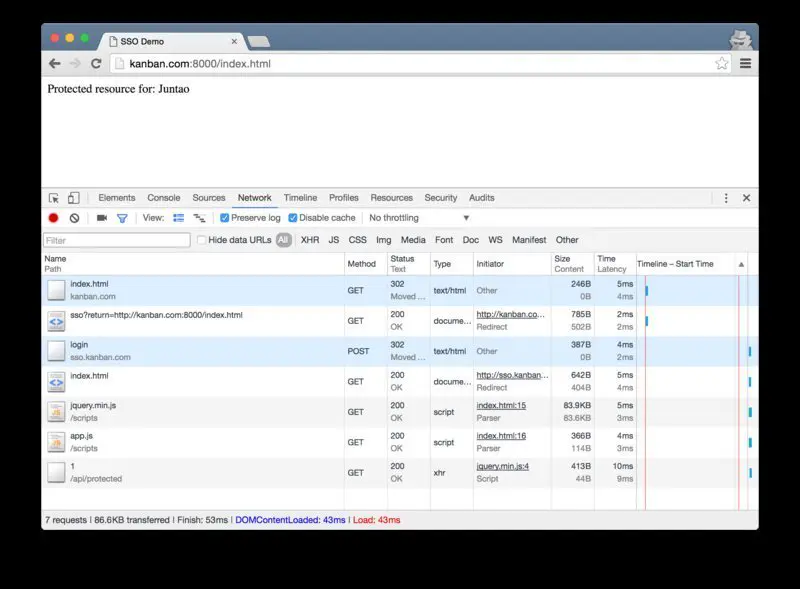
我们举一个具体场景的例子:
- 未登录用户访问
http://kanba.com:8000/index.html - 系统会重定向用户到
http://sso.kanban.com:8100/sso?return=http://kanba.com:8000/index.html - 用户看到登录页面,输入用户名、密码登录
- 用户被重定向回
http://kanba.com:8000/index.html - 此外,
index.html 页面上的app.js对api.kanban.com:9000的访问也得到了授权
环境设置
简单起见,可以通过修改 / etc/hosts 文件来设置服务器环境:
1 | 127.0.0.1 sso.kanban.com |
nginx 及 auth_request
反向代理 nginx 有一个 auth_request 的模块。在一个虚拟 host 中,每个请求会先发往一个内部location,这个内部的location可以指向一个可以做鉴权的 Endpoint。如果这个请求得到的结果是 200,那么 nginx 会返回用户本来请求的内容,如果返回 401,则将用户重定向到一个预定义的地址:
1 | server { |
比如上面这个例子中,auth_request的 URL 为/api/auth,它是一个内部的 location,外部无法访问。在这个locaiton中,请求会被转发到http://api.kanban.com:9000,根据 nginx 的正则语法,请求将会被转发到http://api.kanban.com:9000/api/auth(我们随后可以看到这个 Endpoint 的定义)。
我们设置了请求的原始头信息,并禁用了 request_body,如果 cookie 中包含了w3=(\w+)字样,则将这个 w3 的值抽取出来,并赋值给一个X-KANBAN-TOKEN的 HTTP 头。
权限 Endpoint
对应的/api/auth的定义如下:
1 |
|
如果 HTTP 头上有X-KANBAN-TOKEN且值不为空,则返回 200,否则返回 401。
当这个请求得到 401 之后,用户被重定向到http://sso.kanban.com:8100/sso
1 | error_page 401 = ; |
SSO 组件(简化版)
这里用sinatra定义了一个简单的 SSO 服务器(去除了实际的校验部分)
1 | require 'sinatra' |
/sso对应的 Login Form 是:
1 | <form action="/login" method="post"> |
当用户提交表单之后,我们只是简单的设置了cookie,并重定向用户到跳转前的 URL。
前端页面
这个应用的前端应用非常简单,我们只需要将这些静态文件放到/usr/local/var/www/kanban目录下:
1 | $ tree /usr/local/var/www/kanban |
其中index.html中引用的app.js会请求一个受保护的资源:
1 | $(function() { |
从下图中的网络请求可以看到重定向的流程:
总结
本文我们通过配置反向代理,将多个 Endpoint 组织起来。这个过程可以在应用程序中通过代码实现,也可以在基础设施中通过配置实现,通常来讲,如果可以通过配置来实现的,就尽量将其与负责业务逻辑的代码隔离出来。这样可以保证各个组件的独立性,也可以使得优化和定位问题更加容易。


